How to update the firmware on any Samsung phone
Software updates are a big topic of discussion in the Android world. The unfortunate truth is not enough phones are consistently updated to the latest version of Android. This plays a big role in deciding on which phone to buy. Samsung phones are usually updated pretty well, even if it does take a long time for the updates to roll out. However, you can update the firmware manually by using a nifty tool. We’ll show you how to use Samsung’s “Odin” tool.
Check Your Before we get started with Odin, you should check to see if the update has already been sent to your device over-the-air. An OTA update is super easy to download and install. You will usually get a notification when an OTA update is available. If not, here’s how to check for the update on your Samsung phone.
- Go to Settings
- Scroll down and tap Software update
- Tap Check for updates
- Tap OK
- Follow the steps to install the update if one is available. If not, it will say your phone is up to date.
Manually Install Firmware
If your phone says it’s “up to date” but you know an update is available for your model, we can take advantage of Samsung’s “Odin” tool. Odin is a Windows program that makes it easy to install firmware on Samsung devices. Odin is not actually intended for regular consumers, but it’s easy to find and download.
Because Odin is an official tool from Samsung, your phone will allow it to load the necessary files for flashing firmware. Keep in mind that it is possible to brick your phone with Odin. This may be an official tool, but using it incorrectly can still damage your device. Proceed with caution.
1. Get the right version of Odin
As previously mentioned, Samsung does not offer Odin to the public. You will need to find the correct version for your device from a 3rd-party. Find the XDA Forum for your Samsung device and people will have Odin available to download. The latest version isn’t always the version you should use. Find the XDA thread for updating your device and use that version.
OdinDownload.com is another place where you can download Odin. Again, check your device forum for information on which version of Odin to use.
- Download the installer to your Windows PC
- Unzip the file to somewhere you can remember
- That’s it
2. Download the firmware files
Now that you have Odin we need some firmware to flash with it. This is another time where XDA Forums are your friend. This is the first place you should look when a new update is rolling out. The firmware will usually be compressed into a ZIP file. It’s very important that you get the correct firmware for your device. Using the wrong firmware can completely brick your device. Don’t breeze through this step.
- Check the device compatibility (is it for the Galaxy S8 or S8+?)
- Check carrier compatibility (is it for the AT&T or Verizon model?)
- This is also when you should check for the correct version of Odin to use.
3. The Main Event
Phone We have the software for your computer and the necessary files. Now it’s time for the main event: flashing the firmware. This process takes some time but it isn’t difficult. Make sure to double check everything before starting the process.
- Power off your phone
- Boot into Download Mode
- Old Samsung phones: press Power + Home + Volume down for about 5 seconds.
- New Samsung phones: press Power + Bixby + Volume down for about 5 seconds.
- You should see a teal screen with a big download icon in the middle
- Plug your phone into your PC with the included USB cable
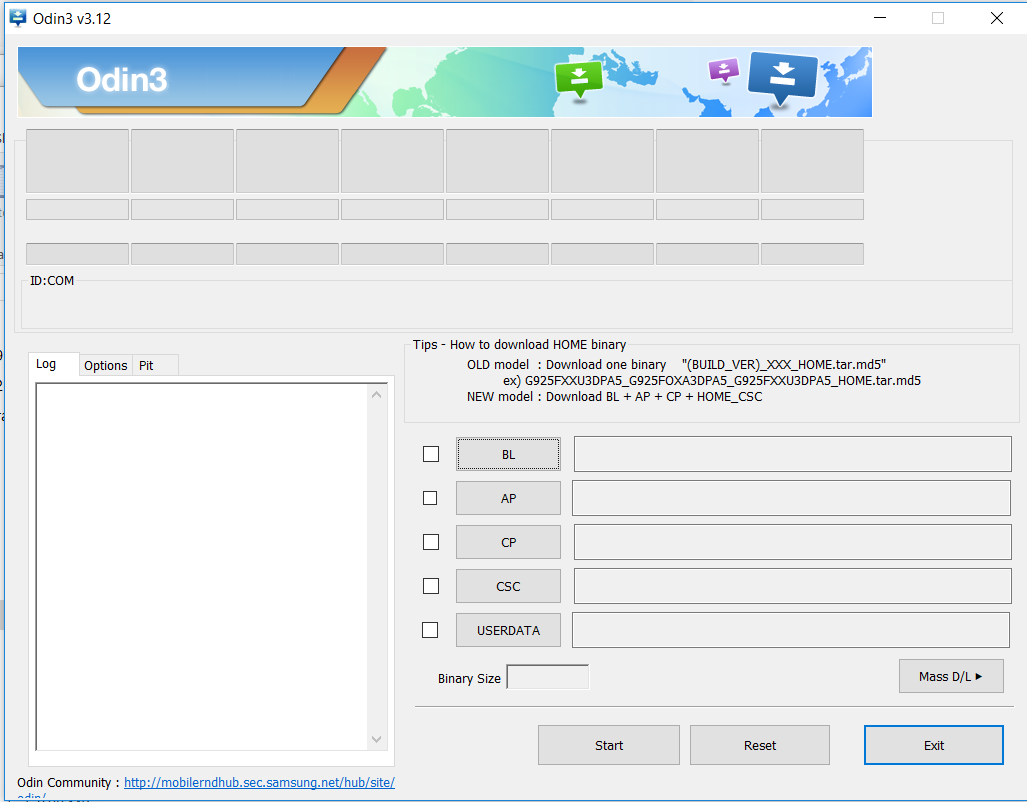
Now it’s time to put Odin to work. Open Odin on your PC. In the “ID:COM” section you should see a teal box that says “Added!” This is your device. The main section of Odin has buttons for BL, AP, CP, and CSC. These signify corresponding firmware files:
- BL: Bootloader
- AP: Android partition
- CP: modern firmware
- CSC: Consumer software customization
You may not need all four of these files. It depends on what you’re flashing. A full ROM flash will require all four. The XDA thread where you downloaded the firmware from should tell you the files that we will be flashing.
- Click the button for the corresponding file
- A File Explorer window will open. Find the file
- Do this for all the files included in the firmware. Make sure they correspond correctly
- Click the box next to each one to put a check mark in it
- If all looks correct (and you have triple checked everything) click the Start button
The process will probably take a while and the phone may reboot a couple of times. Don’t freak out and unplug it before the process is complete. Be patient. A progress bar will be displayed in Odin. When the process has been completed you will see a “Reset” button above the ID:COM section. Click it to reboot the phone. That’s it!
THIS WEBSITE IS FOR SALE CONTACT/WHATSAPP +2349019908422


0 comments: